Liberty Wall Art from Scraps
A beautiful wall art (and huge) project that can bring a festive spirit to your summer living space. Uses scrap boards. Distressing required.

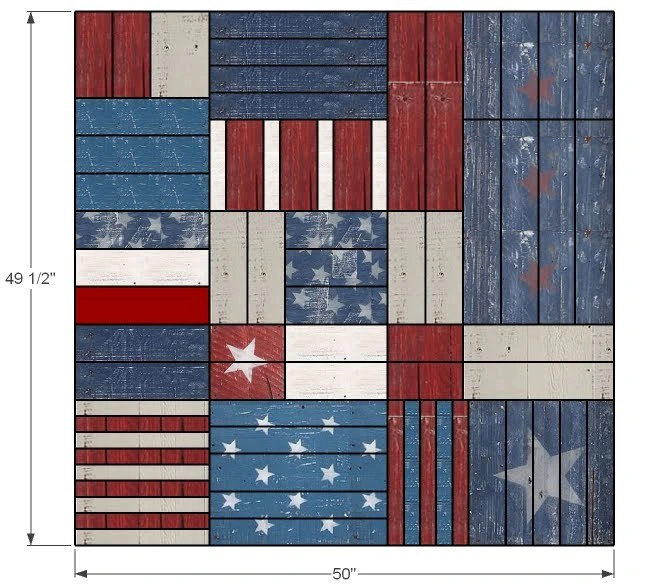
Dimensions
Use the size-specific shopping and cut lists below.
What you need
- 1 – 4′x4′ sheet of plywood, 1/4″ to 1/2″ thickness (can be OSB)
- 5 – 1×4 Furring Strips, 8′ long
- 3 – 1×2 Furring Strips, 8′ Long
- 2 – 1×3 Furring Strips, 8′ Long
- Scrap 1×6
- 1″ nails
- Glue
- Paint and Distressing Materials
- 9 – 1x2s @ 12 1/2″
- 8 – 1×4 @ 12 1/2″
- 2 – 1×4 @ 8″
- 1 – 1×6 @ 8″
- 4 – 1×3 @ 16 1/2″
- 1 – 1×4 @ 16 1/2″
- 2 – 1×4 @ 7″
- 2 – 1×4 @ 10 1/2″
- 5 – 1×4 @ 9 1/2″
- 4 – 1×2 @ 8 1/2″
- 3 – 1×4 @ 8 1/2″
- 4 – 1×3 @ 16 1/2″
- 5 – 1×2 @ 13 1/2″
- 2 – 1×4 @ 7″
- 2 – 1×4 @ 10 1/2″
- 2 – 1×4 @ 18 1/2″
- 1- 1×4 @ 13 1/2″
- 4 – 1×3 @ 13 1/2″
- 2 – 1×4 @ 14″
- 4 – 1×4 @ 19″
- 4 – 1×4 @ 10″
- measuring tape
- square
- pencil
- hammer
- safety glasses
- hearing protection
- jigsaw
Step by step
Cutting And Layout
The diagram above shows the board widths in the project. The red boards are 1x4s, the turquoise are 1x2s, the green are 1x3s and the one blue board is a 1×6. Layout as shown above. Don’t stress if the boards don’t come out exactly even, part of this projects appeal is the hand made character.

Paint And Distressing
Paint your boards and distress as shown above.

Nailing Down
With glue and 1″ nails, start at the upper right corner, and work your way right, gluing and nailing down boards. Keep the top edges flush and check for square as you go. The plywood back will be slightly smaller than the top boards, as shown above.

Finishing
Sand all surfaces, starting with a medium grit and finishing with fine. Wipe off the dust, fill any holes or gaps with wood filler, and sand smooth once dry. Apply primer if you're painting, then finish with your choice of paint or stain and seal with a durable clear topcoat. For outdoor projects, use exterior-rated primer, paint or stain, and sealer so the piece stands up to the weather.